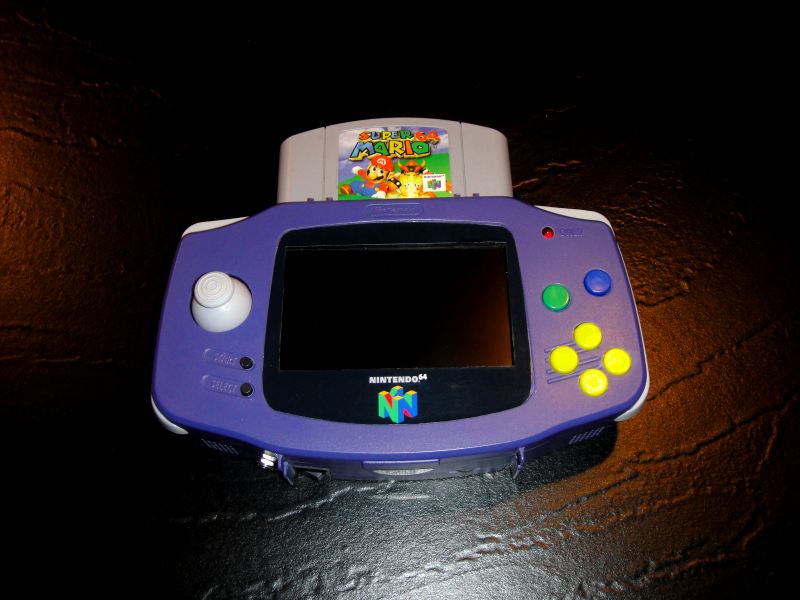


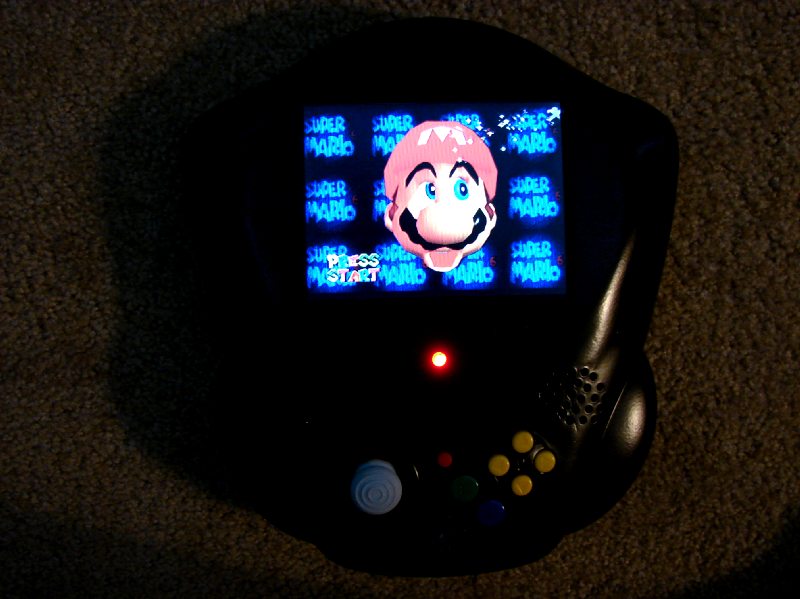
This of course is an N64 portable. I named it the Darth 64 because my kids say it resembled the Darth Vader helmet they have ![]()
I wanted a system that was bulletproof. I bought some from this site and the build quality was shaky to say the least. Hot glue just wasn’t an option.
So I used a case that I could mold into what I wanted but could still be put back together with screws. All integrated plastic parts were ABS Cement melted and fused to the original case, then hard filler bumper epoxy was used then soft fill bumper epoxy for the finishing touches.
The N64 motherboard was attached using plastic stand-offs that were Abs cemented and epoxied in. Then the cart slot was attached to the motherboard with l-brackets and nuts/bolts.
So everything is rock solid. Shake it or drop it and nothing will come loose or rattle.
List of features:
Psone screen with original backlight.
Flush mounted headphone jack.
5000maH Li-Poly batteries with quick charger and protection circuit.
Gamecube style joystick and d-pad.
Rear shoulder buttons and twin z buttons.
Cart slot relocation.
All I have left to do is wet sand the case and polish it in 7 days after the paint is dry.
Here’s how it all started and went down. ![]()
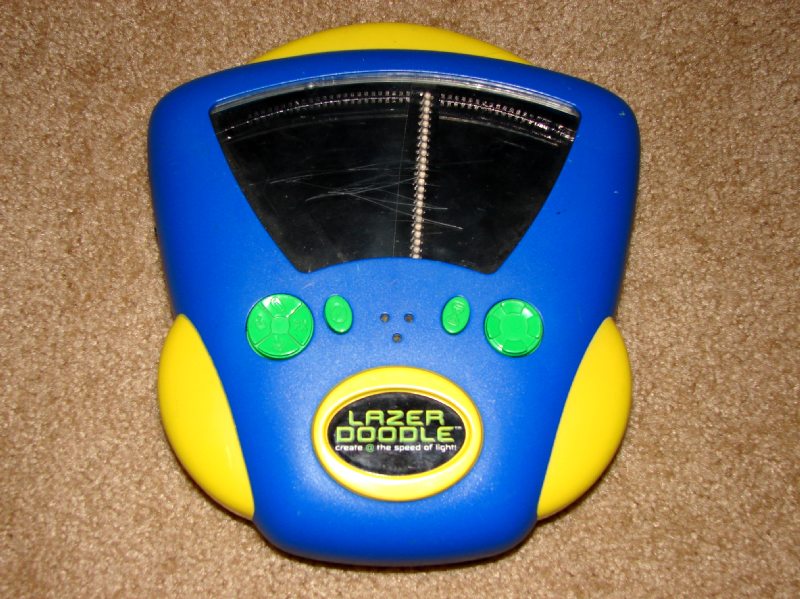
First of all I was at a Flea Market and found an interesting portable. It was called the Lazer Doodle. Thought to myself…”Hmm I might could do something with this 
Here’s a comparison of the case next to a Game Case:
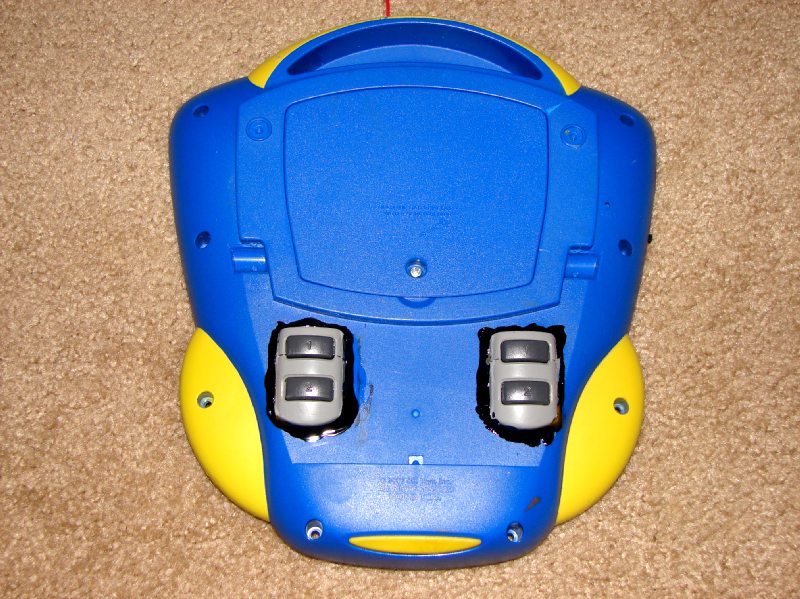
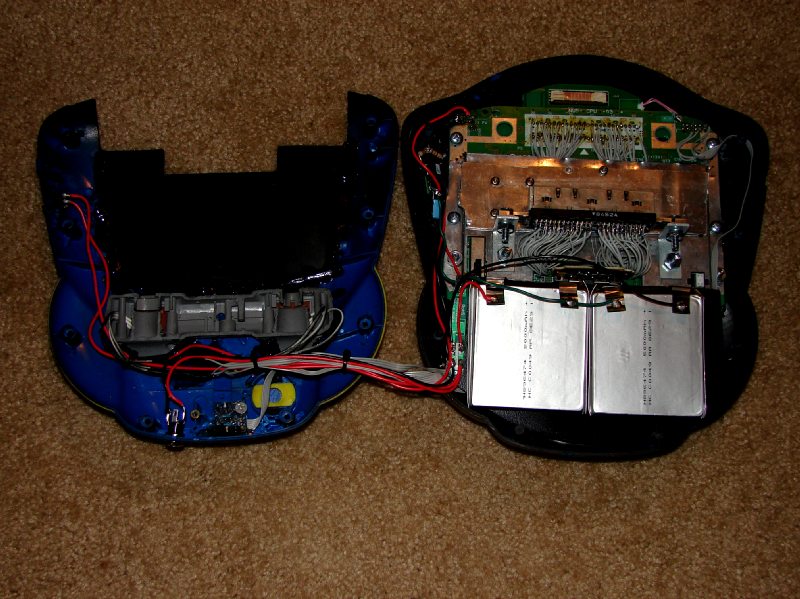
A picture of the back and guts :


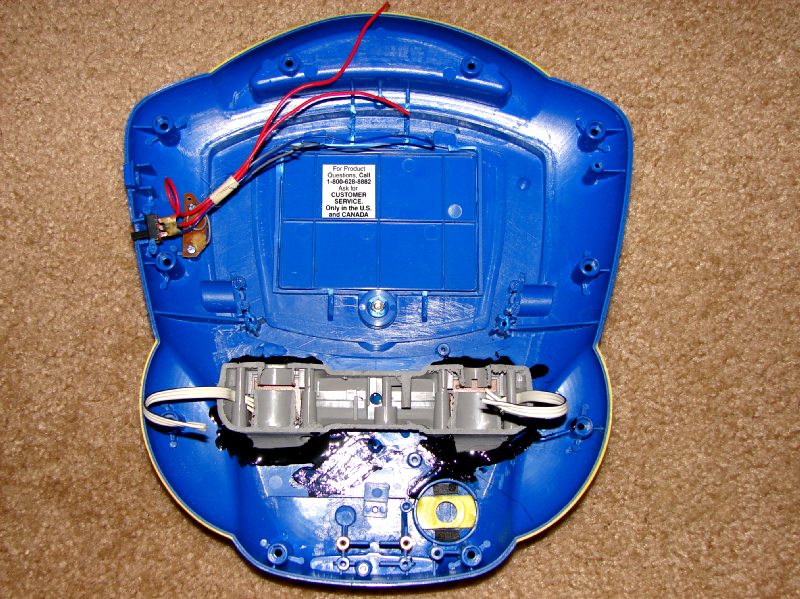
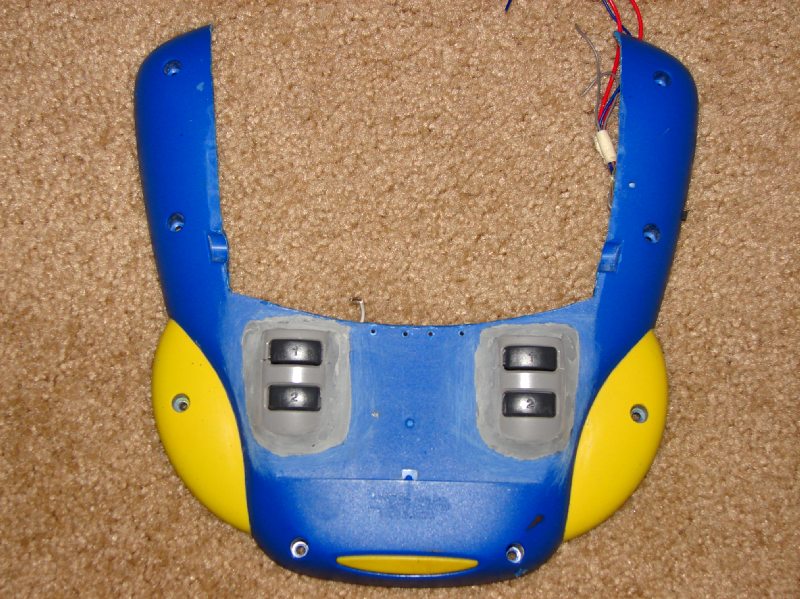
And with the guts out

No here’s the construction log ![]()
I started out like I mentioned wanting a SOLID handheld. So I decided to try a technique not used much.
For plastic, if you use normal epoxy and Bondo spot putty, it can and usually will crack.
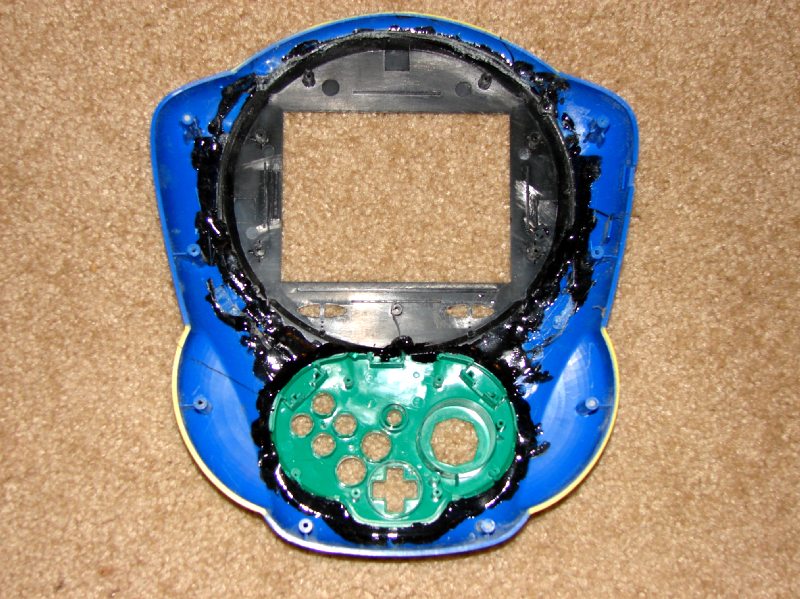
So I used ABS Cement to fuse the parts like the screen, controller, etc to the case. Then I used Plastic Bumper Epoxy Hard filler to fill major gaps and fuse them together even more. :
Then I use a Plastic Bumper Flexible Filler as the “spot putty” to finish it off smooth and crack free for life.
Please note in the following pics I decided to abandon the white piece and add the controller later.
The process is pretty easy. You cut the parts for as close a fit as possible. Then put a spot or three of hot glue to hold the part in place. Tape the backside of the case for large gap areas. Then I use a cue tip, dip it in the Abs cement, and drip it in between the two parts. It adheres pretty quickly. I let it dry in front of a fan for an hour then do it again to fill in missing gaps. Let it dry for about 2-3 hours, flip it over and remove the tape and then using the cue tips drip in the Abs Cement REALLY thick on the backside. Now let it dry for a couple of days.

After a couple of days sand down the Abs plastic on the front side with 36-40 grit sandpaper until it is smooth and level, don’t worry about low spots.

Now it’s time to move on to the hard filler. Mix it and apply it liberally in the areas you need to fill and mold. It dries in 15 minutes and you can sand it down. Use 36-40 grit paper and sand it down real good and as smooth as you can get it.
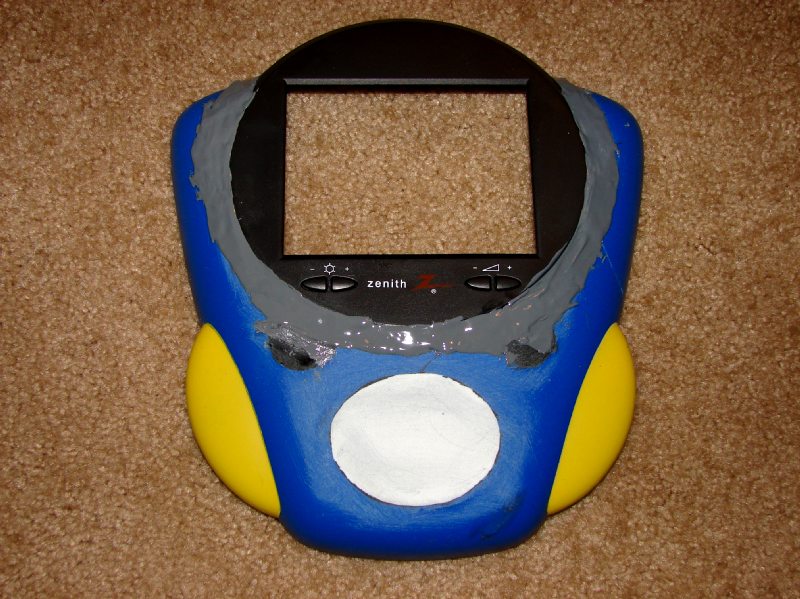

Now move on to the flexible filler. Fill in the low spots and feather out to a flat finish. After it dries in 15 minutes sand it down with 40 grit. You will probably have to do that a time or two. Once it is smooth with no dips move up to 80 grit , then 180 grit, then 320 grit , then 600 grit until it is baby butt smooth.
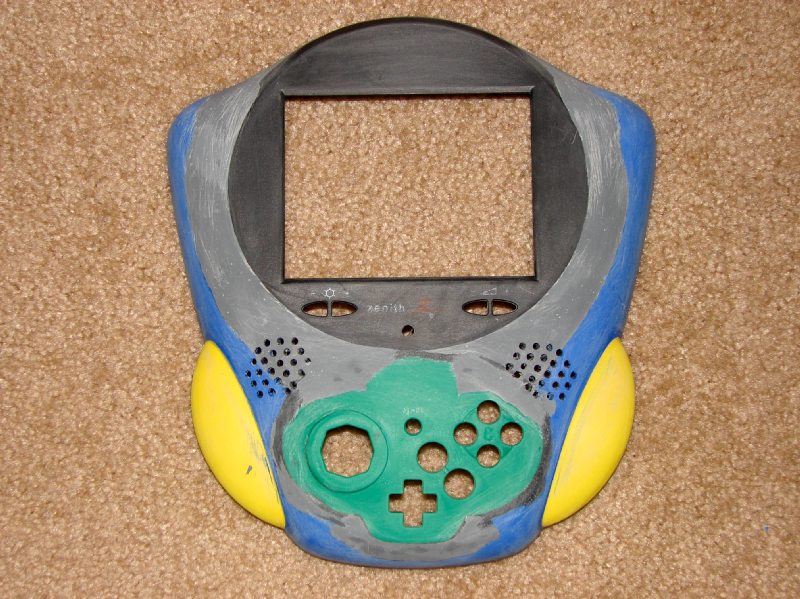
Now put a coat of primer on and look at the flaws :
Now don’t be bashful. Sand it down as smooth as you can get it on the bad spots. Add small amounts of flex filler , let dry and using 80 or 180 grit paper sand it down super smooth , then move on to 320 grit then 600 grit.
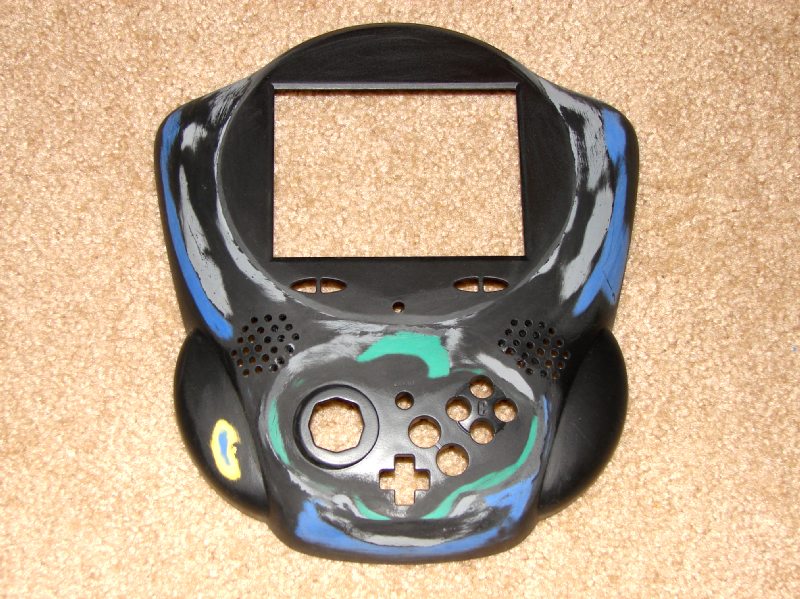
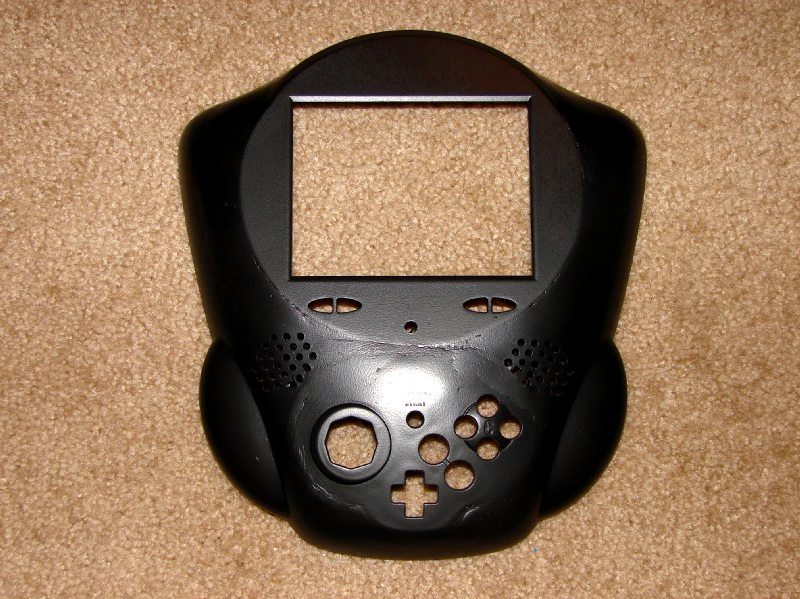
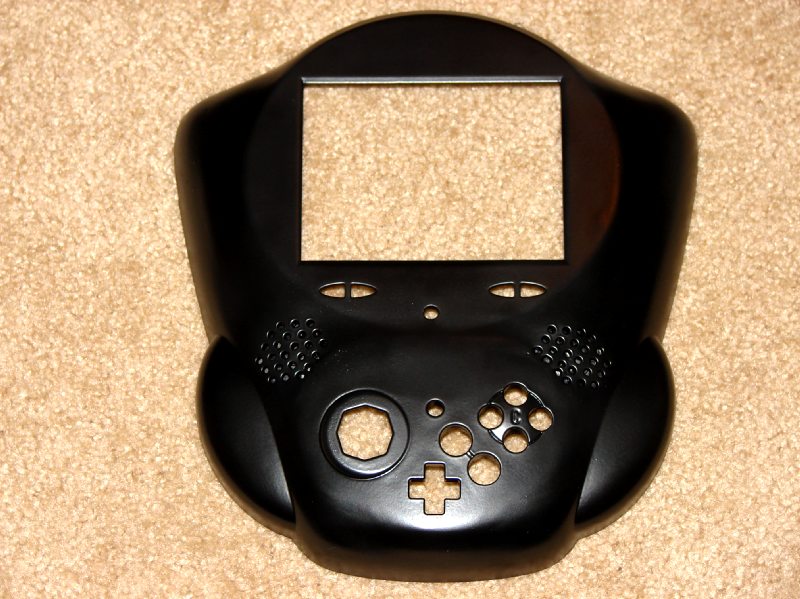
Hopefully, after doing this 2-3 times you will have this :
Now a few more construction notes:
For the controller, I wanted something small and better than the original.
So I went for the Hori MiniPad. It has about the same setup as the Gamecube, in fact, it basically uses the same joystick and layout.
Here it is next to an N64 controller.
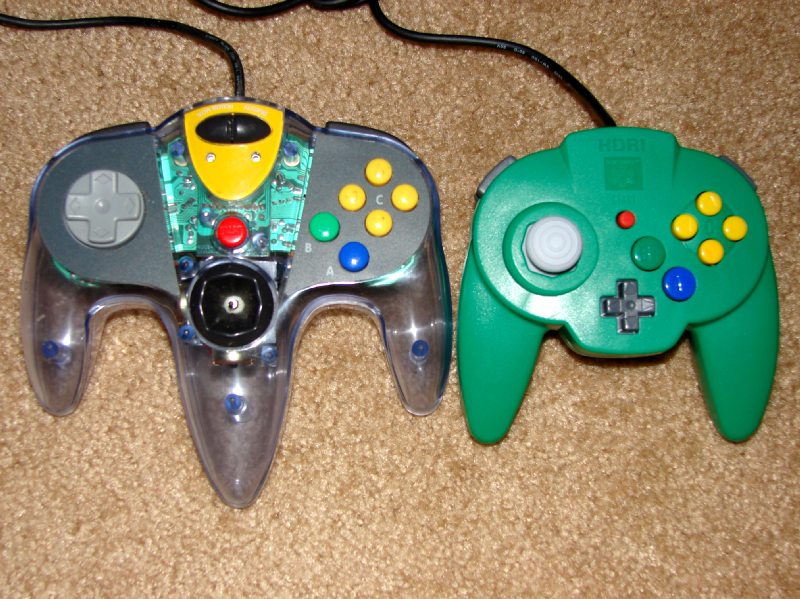
For the back trigger buttons I wanted something different and an old Ps1 pad came to the rescue :
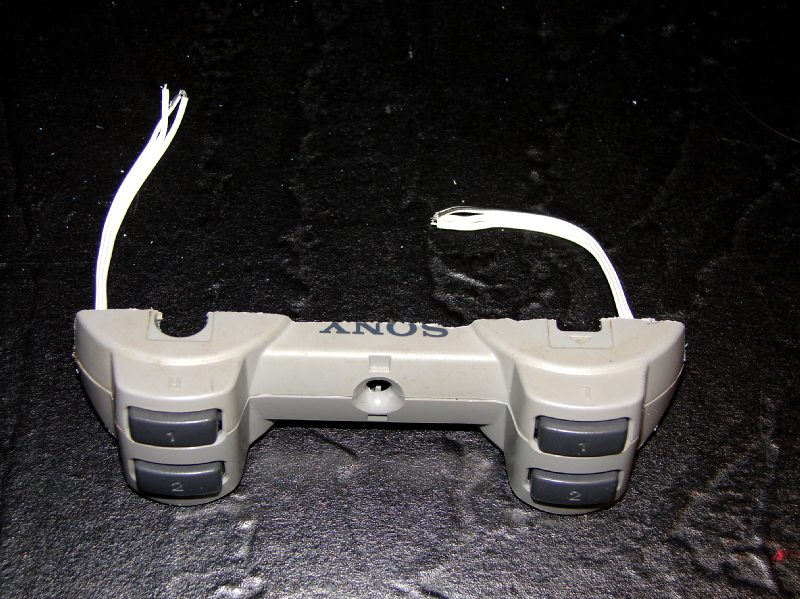
And how I put it in :
I was originally going to have a flip-up cart slot but it was too much stress on the cart slot wires so I went with a more standard cart relocation. :

And here’s how it turned out :

Continue on ![]()
For that reason, the N64 board needed to be mounted solid. So I Abs cemented and epoxied four standoffs in the case:

Now I could solidly mount the N64 board. Also I wanted a solid cart slot. So I used L brackets to mount them to the heatsink/rf shielding, then I bolted that to the N64 motherboard.

I used 2 Li-Poly 5000mah batteries with smart charger and protection circuit.
Here is everything wired together :
And with the battery cover and cart slot cover in place :

I also flush mounted a headphone jack and added the power charging jack :
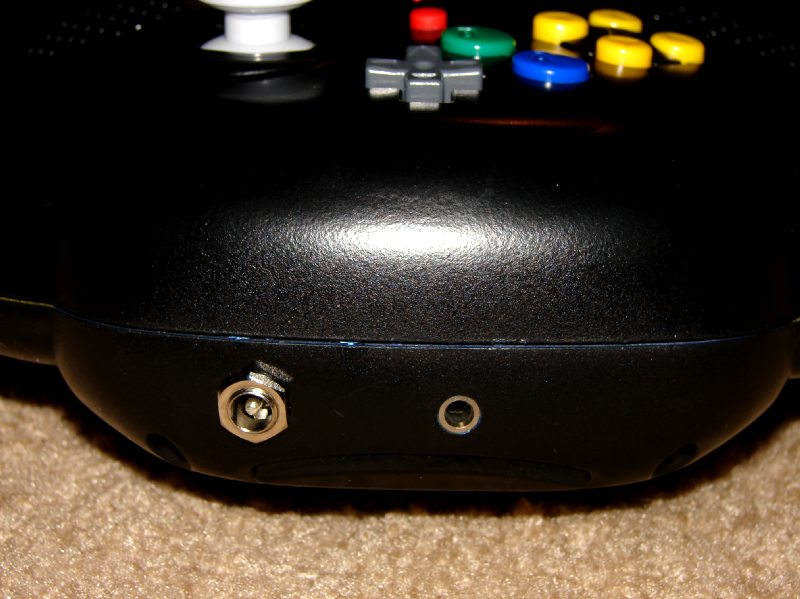
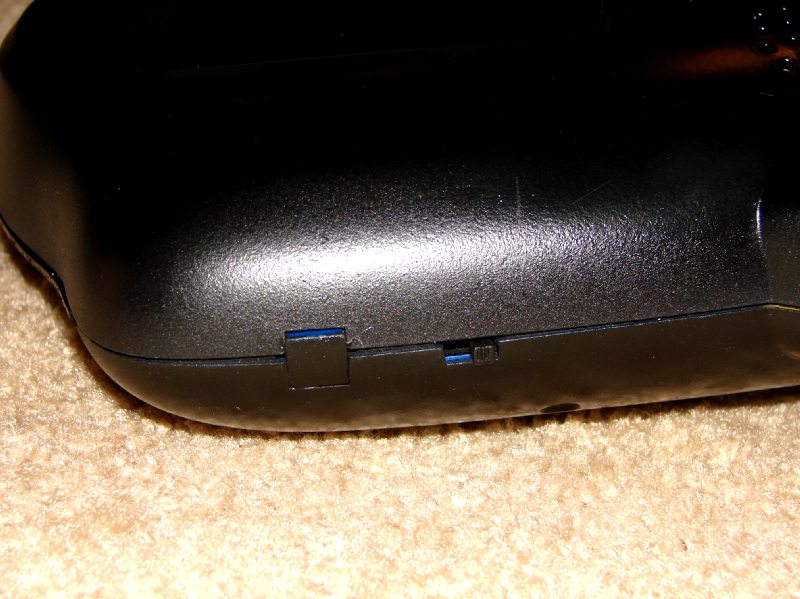
And I used the built in power switch :
And of course, the finished pics as you’ve seen :
The back didn’t turn out as smooth as I wanted but I was running out of time ![]()
This of course is an N64 portable. I named it the Darth 64 because my kids say it resembled the Darth Vader helmet they have ![]()
I wanted a system that was bulletproof. I bought some from this site and the build quality was shaky to say the least. Hot glue just wasn’t an option.
So I used a case that I could mold into what I wanted but could still be put back together with screws. All integrated plastic parts were ABS Cement melted and fused to the original case, then hard filler bumper epoxy was used then soft fill bumper epoxy for the finishing touches.
The N64 motherboard was attached using plastic stand-offs that were Abs cemented and epoxied in. Then the cart slot was attached to the motherboard with l-brackets and nuts/bolts.
So everything is rock solid. Shake it or drop it and nothing will come loose or rattle.
List of features:
Psone screen with original backlight.
Flush mounted headphone jack.
5000maH Li-Poly batteries with quick charger and protection circuit.
Gamecube style joystick and d-pad.
Rear shoulder buttons and twin z buttons.
Cart slot relocation.
All I have left to do is wet sand the case and polish it in 7 days after the paint is dry.
Here’s how it all started and went down. ![]()
First of all I was at a Flea Market and found an interesting portable. It was called the Lazer Doodle. Thought to myself…”Hmm I might could do something with this
Here’s a comparison of the case next to a Game Case:
A picture of the back and guts :
And with the guts out
No here’s the construction log ![]()
I started out like I mentioned wanting a SOLID handheld. So I decided to try a technique not used much.
For plastic, if you use normal epoxy and Bondo spot putty, it can and usually will crack.
So I used ABS Cement to fuse the parts like the screen, controller, etc to the case. Then I used Plastic Bumper Epoxy Hard filler to fill major gaps and fuse them together even more. :
Then I use a Plastic Bumper Flexible Filler as the “spot putty” to finish it off smooth and crack free for life.
Please note in the following pics I decided to abandon the white piece and add the controller later.
The process is pretty easy. You cut the parts for as close a fit as possible. Then put a spot or three of hot glue to hold the part in place. Tape the backside of the case for large gap areas. Then I use a cue tip, dip it in the Abs cement, and drip it in between the two parts. It adheres pretty quickly. I let it dry in front of a fan for an hour then do it again to fill in missing gaps. Let it dry for about 2-3 hours, flip it over and remove the tape and then using the cue tips drip in the Abs Cement REALLY thick on the backside. Now let it dry for a couple of days.
After a couple of days sand down the Abs plastic on the front side with 36-40 grit sandpaper until it is smooth and level, don’t worry about low spots.
Now it’s time to move on to the hard filler. Mix it and apply it liberally in the areas you need to fill and mold. It dries in 15 minutes and you can sand it down. Use 36-40 grit paper and sand it down real good and as smooth as you can get it.
Now move on to the flexible filler. Fill in the low spots and feather out to a flat finish. After it dries in 15 minutes sand it down with 40 grit. You will probably have to do that a time or two. Once it is smooth with no dips move up to 80 grit , then 180 grit, then 320 grit , then 600 grit until it is baby butt smooth.
Now put a coat of primer on and look at the flaws :
Now don’t be bashful. Sand it down as smooth as you can get it on the bad spots. Add small amounts of flex filler , let dry and using 80 or 180 grit paper sand it down super smooth , then move on to 320 grit then 600 grit.
Hopefully, after doing this 2-3 times you will have this :
Now a few more construction notes:
For the controller, I wanted something small and better than the original.
So I went for the Hori MiniPad. It has about the same setup as the Gamecube, in fact, it basically uses the same joystick and layout.
Here it is next to an N64 controller.
For the back trigger buttons I wanted something different and an old Ps1 pad came to the rescue :
And how I put it in :
I was originally going to have a flip-up cart slot but it was too much stress on the cart slot wires so I went with a more standard cart relocation. :
And here’s how it turned out :
Continue on ![]()
Now like I said I wanted it to be solid.
For that reason, the N64 board needed to be mounted solid. So I Abs cemented and epoxied four standoffs in the case:
Now I could solidly mount the N64 board. Also I wanted a solid cart slot. So I used L brackets to mount them to the heatsink/rf shielding, then I bolted that to the N64 motherboard.
I used 2 Li-Poly 5000mah batteries with smart charger and protection circuit.
Here is everything wired together :
And with the battery cover and cart slot cover in place :
I also flush mounted a headphone jack and added the power charging jack :
And I used the built in power switch :
And of course, the finished pics as you’ve seen :
The back didn’t turn out as smooth as I wanted but I was running out of time ![]()
This of course is an N64 portable. I named it the Darth 64 because my kids say it resembled the Darth Vader helmet they have
This of course is an N64 portable. I named it the Darth 64 because my kids say it resembled the Darth Vader helmet they have ![]()
I wanted a system that was bulletproof. I bought some from this site and the build quality was shaky to say the least. Hot glue just wasn’t an option.
So I used a case that I could mold into what I wanted but could still be put back together with screws. All integrated plastic parts were ABS Cement melted and fused to the original case, then hard filler bumper epoxy was used then soft fill bumper epoxy for the finishing touches.
The N64 motherboard was attached using plastic stand-offs that were Abs cemented and epoxied in. Then the cart slot was attached to the motherboard with l-brackets and nuts/bolts.
So everything is rock solid. Shake it or drop it and nothing will come loose or rattle.
List of features:
Psone screen with original backlight.
Flush mounted headphone jack.
5000maH Li-Poly batteries with quick charger and protection circuit.
Gamecube style joystick and d-pad.
Rear shoulder buttons and twin z buttons.
Cart slot relocation.
All I have left to do is wet sand the case and polish it in 7 days after the paint is dry.
Here’s how it all started and went down. ![]()
First of all I was at a Flea Market and found an interesting portable. It was called the Lazer Doodle. Thought to myself…”Hmm I might could do something with this ![]()
Here’s a comparison of the case next to a Game Case:
A picture of the back and guts :
And with the guts out
No here’s the construction log ![]()
I started out like I mentioned wanting a SOLID handheld. So I decided to try a technique not used much.
For plastic, if you use normal epoxy and Bondo spot putty, it can and usually will crack.
So I used ABS Cement to fuse the parts like the screen, controller, etc to the case. Then I used Plastic Bumper Epoxy Hard filler to fill major gaps and fuse them together even more. :
http://www.urethanesupply.com/mm5/merch … ode=2020-T
Then I use a Plastic Bumper Flexible Filler as the “spot putty” to finish it off smooth and crack free for life.
http://www.urethanesupply.com/mm5/merch … ode=2000-T
Please note in the following pics I decided to abandon the white piece and add the controller later.
The process is pretty easy. You cut the parts for as close a fit as possible. Then put a spot or three of hot glue to hold the part in place. Tape the backside of the case for large gap areas. Then I use a cue tip, dip it in the Abs cement, and drip it in between the two parts. It adheres pretty quickly. I let it dry in front of a fan for an hour then do it again to fill in missing gaps. Let it dry for about 2-3 hours, flip it over and remove the tape and then using the cue tips drip in the Abs Cement REALLY thick on the backside. Now let it dry for a couple of days.
After a couple of days sand down the Abs plastic on the front side with 36-40 grit sandpaper until it is smooth and level, don’t worry about low spots.
Now it’s time to move on to the hard filler. Mix it and apply it liberally in the areas you need to fill and mold. It dries in 15 minutes and you can sand it down. Use 36-40 grit paper and sand it down real good and as smooth as you can get it.
Now move on to the flexible filler. Fill in the low spots and feather out to a flat finish. After it dries in 15 minutes sand it down with 40 grit. You will probably have to do that a time or two. Once it is smooth with no dips move up to 80 grit , then 180 grit, then 320 grit , then 600 grit until it is baby butt smooth.
Now put a coat of primer on and look at the flaws :
Now don’t be bashful. Sand it down as smooth as you can get it on the bad spots. Add small amounts of flex filler , let dry and using 80 or 180 grit paper sand it down super smooth , then move on to 320 grit then 600 grit.
Hopefully, after doing this 2-3 times you will have this :
Now a few more construction notes:
For the controller, I wanted something small and better than the original.
So I went for the Hori MiniPad. It has about the same setup as the Gamecube, in fact, it basically uses the same joystick and layout.
Here it is next to an N64 controller.
For the back trigger buttons I wanted something different and an old Ps1 pad came to the rescue :
And how I put it in :
I was originally going to have a flip-up cart slot but it was too much stress on the cart slot wires so I went with a more standard cart relocation. :
And here’s how it turned out :
Continue on ![]()
Now like I said I wanted it to be solid.
For that reason, the N64 board needed to be mounted solid. So I Abs cemented and epoxied four standoffs in the case:
Now I could solidly mount the N64 board. Also I wanted a solid cart slot. So I used L brackets to mount them to the heatsink/rf shielding, then I bolted that to the N64 motherboard.
I used 2 Li-Poly 5000mah batteries with smart charger and protection circuit.
Here is everything wired together :
And with the battery cover and cart slot cover in place :
I also flush mounted a headphone jack and added the power charging jack :
And I used the built in power switch :
And of course, the finished pics as you’ve seen :
The back didn’t turn out as smooth as I wanted but I was running out of time ![]()